How Many Panels Does a Mural Wallpaper Usually Include?
Understand how wall dimensions, panel width, artwork proportions and installation planning affect the number of mural panels.
Article focus: pricing and measurement
Budgeting this wall with confidence
Start with accurate wall measurements; the final custom mural price depends on area, material and any finishing options.

Example application: Any room with a suitable, prepared wall · pricing and measurement
How many panels will a mural wallpaper include? For a Solowalls order, you can make a useful estimate once you know the width submitted for printing and the chosen material. The current product specification gives 60 cm panel width for Non-Woven, Peel and Stick and Heavy, and 50 cm for Vinyl. Divide the submitted print width by the relevant nominal panel width and round up; then confirm the actual numbered layout with the order. That last step matters because trim, edge treatment and special walls may affect production.
Begin with print width, not the catalogue image
The same landscape can be ordered for a narrow alcove or a wide living-room wall. The artwork may be cropped or scaled differently, and the physical print width changes with the wall. Solowalls currently asks customers to add about 10 cm (4 in) to the measured overall width and height for installation trimming. Thus a wall measured at 300 cm wide is entered as approximately 310 cm wide, assuming that allowance has not already been included. Do not add the same allowance a second time.
The product page currently states that each roll forms one installation panel. It lists 60 cm widths for Non-Woven, Peel and Stick and Heavy, but 50 cm for Vinyl. Those figures describe this site's current options, not an industry rule. A room photograph cannot reveal which material or order width was used for the pictured wall. If the specific product or confirmation gives a different panel plan, ask the seller to reconcile it before production.
Keep three numbers separate: measured wall width, submitted print width and nominal panel width. Mixing them is the common source of contradictory estimates. Height determines how long each full-height drop must be; it does not usually multiply the number of side-by-side strips on an ordinary rectangular wall. Unusual height or geometry may require a different arrangement, so ask for a plan rather than relying on the simple estimate in those cases.
Two estimates show why material choice can change the count
The calculation gives an estimate, not a cutting plan: divide the ordered overall print width by the stated nominal panel width and round up to the next whole number. Do not round to the nearest number or subtract a door opening from the width first. The last panel need not equal the arithmetic remainder; production may distribute widths differently to place joins more sensibly. If the supplier specifies printed overlap or a special edge, ask whether its nominal width is the sheet width or the visible coverage used for the final layout.
Take a wall measured at 240 cm wide. With 10 cm added to the overall width, the submitted print width is 250 cm. At a nominal 60 cm per panel, 250 ÷ 60 is approximately 4.17, so the simple estimate is five panels. At 50 cm, 250 ÷ 50 is exactly five. Different panel widths can produce the same count while placing their joins in different positions; “five panels” alone does not tell an installer where a face or horizon crosses a seam.
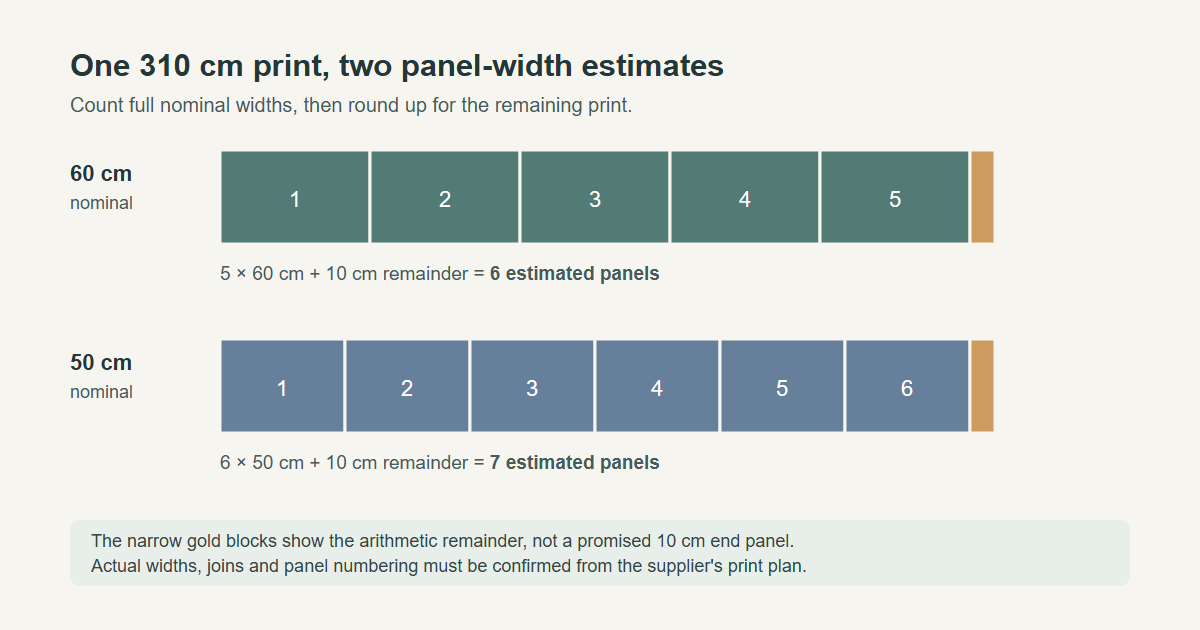
Now take a 300 cm measured wall entered as a 310 cm print. At 60 cm per panel, 310 ÷ 60 is approximately 5.17, suggesting six panels. At 50 cm, 310 ÷ 50 is 6.2, suggesting seven. The outer panel may be narrower than a full panel, or the printer may distribute widths according to its production layout. Do not cut the last strip to the arithmetic remainder before receiving and checking the actual print.
These calculations assume one rectangular wall, the current nominal widths and no special layout constraint. They are not an order specification. A staircase, alcove or unusually high wall can change how pieces are produced and handled. Likewise, a supplier that specifies an overlap may distinguish physical panel width from visible coverage. Ask for the joining method and a production layout before making a precise seam-placement plan.

Translate panel count into a placement question
On one flat run, five panels usually create four internal joins; six create five, before you consider the outer wall edges. More joins are not automatically worse, because a narrower panel can be easier to handle. Yet the position of a join matters when a mural has a face, bird, delicate branch or straight architectural line. The Wallcoverings Association's hanging guidance advises planning seams and focal points together. Ask whether the crop or panel position can be adjusted if a key detail sits on an awkward join.
A useful panel diagram shows the ordered overall print width, the numbered left-to-right sequence, the width of each drop and the intended joint method. Compare it with the approved artwork crop, not just with a blank wall rectangle. A window or door does not necessarily reduce the printed width; an image may continue through the area later cut away around that opening. With an alcove or adjoining wall, ask for each surface to be planned explicitly rather than presuming the same strip rhythm will wrap a corner.
Panel count also affects labour. A narrow final strip beside a doorframe may be awkward to trim, while a broad panel spanning a high wall may need more controlled handling. Share any supplied layout with an installer before printing if access or join position is important. Counting pieces is useful only when it helps the team plan the image and installation.
Count the delivered pieces before installation
Compare the number of labelled physical pieces with the order information and any numbered layout supplied. They should describe the same installation, even if an outer drop is narrower or a wall opening cuts through a piece. Do not discard an apparently narrow end panel because the wall width looks covered when the other drops are laid loosely on the floor. Its printed edge may carry the final part of the scene and the trim needed at the boundary.
When the package arrives, lay the panels on a clean surface in numerical order and count them against the confirmation or final diagram. Check that the edge of each piece continues the artwork from its neighbour and that the full image matches the approved crop. If a panel is missing, damaged or apparently reversed, photograph the labels and printed edges before applying paste or removing backing. The Wallcoverings Association's installation guidance advises inspecting material and stopping when a discrepancy is found.
Do not infer the required order by looking at similar foliage or texture alone. Keep the labels visible until fitting is complete. The first panel's vertical reference and each subsequent image match remain important, but those are installation steps; the count check is simply to confirm that the order you received is complete. A missing final panel cannot be solved by stretching earlier ones.
What number should you expect?
Watch the thresholds rather than counting divisions in a product photograph. On the simple nominal-width estimate, a 300 cm submitted print fits five 60 cm panels, but 301 cm rounds up to six. With 50 cm panels, 300 cm suggests six and 301 cm suggests seven. A centimetre added at a threshold can therefore change the estimated count even though it barely changes the wall. The supplier's actual layout still governs usable coverage, edge allowance and join positions.
Before checkout, keep the measured wall width, entered print width and selected finish on one note. If seam placement could cut through a face, doorway detail or straight line, ask for a numbered panel layout that shows each drop's width and joining method. On delivery, compare that plan with the labels and the approved crop before cutting anything. An unexpected count does not prove a mistake: sheet width, visible coverage after an overlap and redistributed outer drops may differ. Ask the supplier to reconcile the numbers rather than trying to resize a panel yourself.