How Wide Are Mural Wallpaper Panels?
Learn why panel width depends on the supplier, material and production format, and why the installation sequence still matters.
Article focus: pricing and measurement
What to settle before pricing
Start with accurate wall measurements; the final custom mural price depends on area, material and any finishing options.

Example application: Any room with a suitable, prepared wall · pricing and measurement
Panel width affects much more than the number of strips in a box. It determines where joins may fall across a face, a tree trunk or a crisp geometric line, and it shapes the sequence an installer will hang. There is no industry-wide width for every wall mural. The useful answer is the stated width for the material and supplier you are actually ordering, followed by a check of the final panel plan for your wall.
Short answer: Solowalls' current product page states that Non-Woven, Peel and Stick and Heavy mural panels are 60 cm wide, while Vinyl panels are 50 cm wide. Another supplier may use a different width. The final number of panels depends on the submitted print width and production layout; confirm the numbered panel plan rather than assuming a fixed count from a room photograph.Start with the material-specific figure
On Solowalls product pages, the “Roll / panel width” specification says each roll forms one installation panel. It gives 60 cm for Non-Woven, Peel and Stick and Heavy, and 50 cm for Vinyl. A second note describes the range as 50–60 cm across the four materials. That is the current site specification, not a statement that all mural wallpaper is manufactured to those widths. Check the selected material at the time of ordering because a generic “panel width” question has no single answer without it.
These are material-specific figures, not a universal wallpaper standard. Other manufacturers may print narrower or wider drops, and even one supplier may have a different specification for a special collection. If the product page, order confirmation and installation sheet do not agree, ask which figure applies to the actual material and artwork before production. A width quoted for a sample or a roll is not automatically the usable width of an installed mural panel.
The material choice therefore belongs early in the planning process. A 50 cm Vinyl layout can place joins at different points in an image from a 60 cm Non-Woven layout. If you approve a crop preview and then change material, ask whether the panel map and proof need to be reviewed again. The visual design may remain identical while the way it is divided for hanging changes.
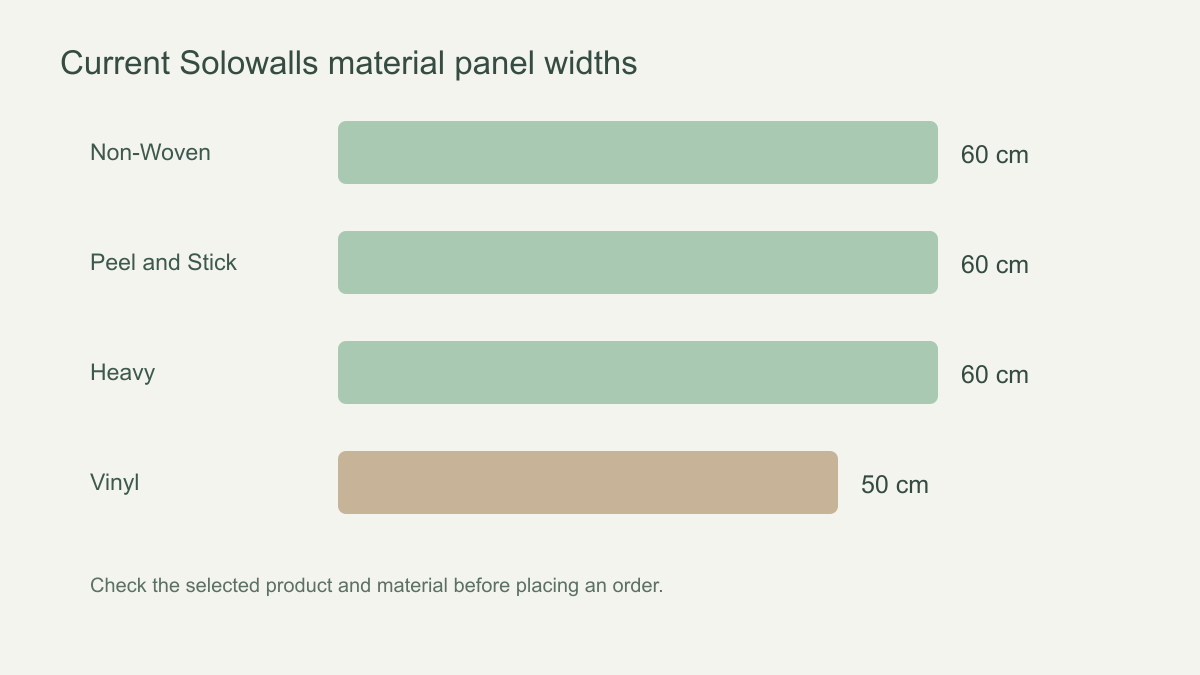 Use the width of the material selected for the actual order.
What changes when the panels are 50 cm instead of 60 cm?
A narrower nominal width changes the rhythm of vertical joins across the same approved image. On a 310 cm print, a simple division suggests six 60 cm panels or seven 50 cm panels. That is only a count estimate; the supplier may balance the outer drops or use a different edge treatment. The important planning difference is not merely one extra piece. It is where each join could cross the visible part of a face, branch or straight line once the image is hung.
Sketch the wall at scale and mark the centre of the approved artwork, its important motifs and any openings. Then ask for the actual production map for the chosen finish. A 50 cm grid drawn from the left edge of a room photograph is not a reliable substitute: the print may contain trim beyond the visible wall and the outer panels may be redistributed. If a material change moves a join through the focal point, ask whether the crop or panel placement can be adjusted before approval.
Panel count is covered in detail in our panel-count guide. For the width decision, compare what each material's proposed seam map does to the artwork and how manageable its drops are at the wall's height. A narrower strip may be easier to carry through a tight stairwell or position around an obstruction, but it can also mean another join to align. Neither width is automatically the better installation choice for every room.
Plan the outer strips, not just the regular intervals
The first and last drops deserve particular attention. A simple division may leave a small theoretical remainder, but it does not mean the printer will supply a 10 cm strip at the edge. A production plan might balance the two outer panels, shift the start position or use another approved arrangement. Ask for the widths of the actual numbered drops before deciding where the first vertical reference should go.
Place that plan over a wall elevation showing doorframes, windows, corners and the intended sightline. A join immediately beside a door may leave a narrow exposed section above the opening; a join through a window may disappear for much of its height but reappear above and below. What matters is the remaining visible artwork, not the amount hidden behind the opening. A sofa or headboard can also conceal the lower part of a join while leaving its upper section prominent.
Keep the ordered print width separate from the visible wall width while reviewing this map. Solowalls currently asks for about 10 cm (4 in) added to each overall dimension for trimming; that surplus is not a fixed border around the image. It can be consumed unevenly on a wall that is not square. For a full measurement method, use our measurement-mistakes guide; here the question is whether the final panel layout still puts the artwork's important details in the intended visible area.
Nominal width is not the same as exposed width
The full strip may include material that is trimmed at a wall edge, or a final panel may be less than the normal width. Installation methods also differ: some coverings are butted edge to edge, while a special system may have an overlap or double-cut instruction. Do not infer an overlap from a photograph of uninstalled rolls. Follow the supplied instructions for the exact product, and ask whether the stated width refers to cut panels, printed image width or hanging width if the wording is unclear.
Panel height is another measurement entirely. A 60 cm panel width says nothing about whether a mural fits a 240 cm or a 300 cm high wall. Height follows the ordered print dimensions and trim guidance. For sloped ceilings or staircases, the simple multiplication of uniform rectangles may be inadequate; provide a measured wall diagram and discuss the panel layout with the printer and installer.
If an installer asks for “usable width”, ask why. They may be accounting for an overlap, a double-cut seam, an unprinted margin or a cut-off edge. None of those should be guessed from the nominal figure alone. The accompanying hanging instructions determine whether adjacent panels meet edge to edge or use a specified overlap. Order the complete mural as planned; do not calculate your own reduced panel width unless the manufacturer expressly supplies that instruction.
Why joins matter visually
In a continuous landscape, seams are part of how one large image is assembled. A careful print and installation sequence should carry the picture across them, but the position of a join can still matter at a focal point. A fine vertical line in an abstract design or the edge of a face may make a small misalignment easier to notice than a diffuse cloud or foliage texture. Review a panel preview if available and tell the installer which details matter most.
Do not try to change a product's panel width by cutting all the strips narrower yourself. That could remove registration, confuse the numbered order or move intended joins. Instead, identify the primary sightline: perhaps the view from the door, the centre of a bedhead or a dining table. If a face, a strong straight line or another critical motif lands close to a proposed join, ask whether the artwork can be positioned differently within the printed wall size. The seller must confirm what is possible for that order.
A doorway can conceal part of a panel but may also leave a thin strip above the frame. A window creates a similar interruption. A fireplace or recess may split the mural into visually separate areas. These architectural features do not change the published material width; they change which sections remain visible after trimming. Show a scaled wall elevation to the supplier if the interrupted areas are substantial. Otherwise, a panel count alone tells you little about how the image will read in the room.
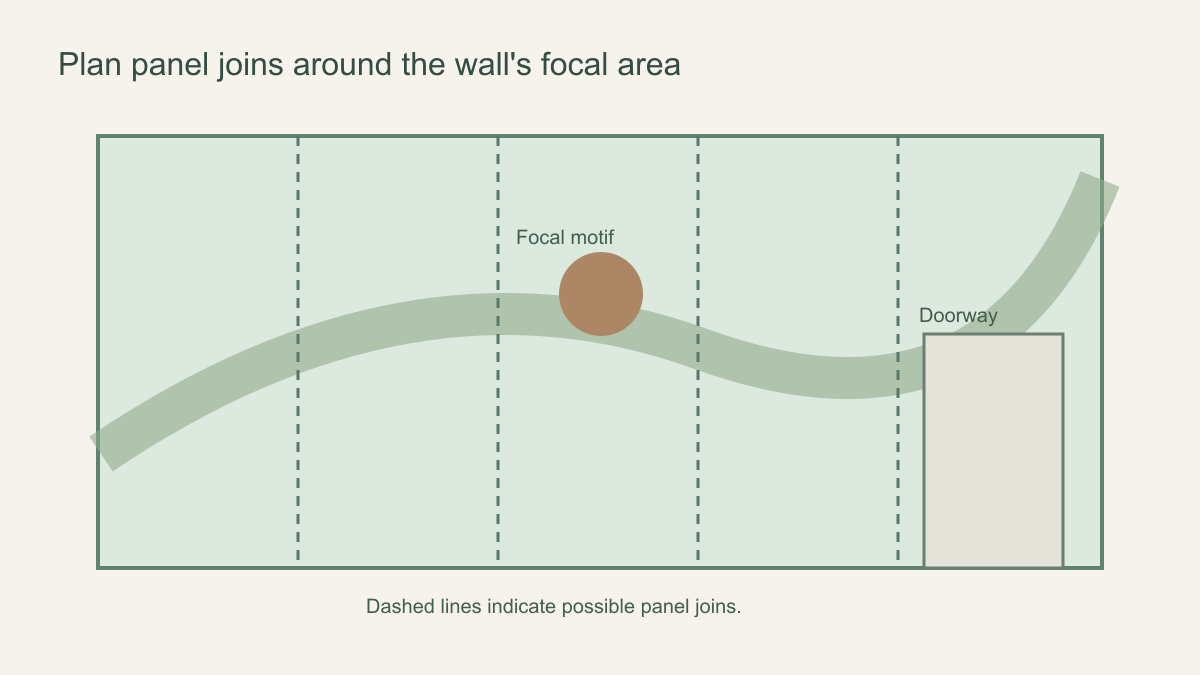 A panel plan helps reveal whether a seam crosses an important motif or opening.
Check the delivered width against the approved map
Before cutting or hanging, compare the selected material on the order with the widths and numbering on the supplied panel plan. Lay out the protected drops in order and verify whether any outer piece is intentionally narrower. If the packing list gives only a total count, request the actual widths and joining instructions instead of assuming every piece matches the nominal specification. A mismatch between the order, diagram and physical strips needs an explanation before installation starts.
Mark the intended starting edge and important sightline on the wall elevation, then check that the printed focal point falls where the approved crop placed it. This review is especially useful when a doorway or fireplace breaks the run into short visible sections. Photograph the labels, edges and full dry layout if a strip appears missing, reversed or unexpectedly narrow. The supplier can then compare the evidence with its production map; trimming or rearranging pieces first would make that comparison harder.